
What is the Relationship of Water and Flour?
Flour absorbs water like a sponge. The amount of water you use within a recipe is called the hydration rate. Adding water to flour hydrates the proteins, gliadin and glutenin, also known as gluten. The proteins will bind together and form chains not unlike little squiggly ladders . These chains have pockets able to trap the gas produced by the fermentation process in the yeast you add to your dough. This provides strength and structure to your bread. The more water that is in your dough, the easier it is for this process to work and you’ll end up with lots of pockets of air. The less water, the tighter the crumb will be as the proteins don’t have as much room to roam around. Depending on the type of dough you are after, say a bagel versus a ciabatta determines the amount of dough hydration or water you want in your recipe.
How Hydration Rates Affect the Bread
Ultimately, not only does the hydration rate affect the dough, but it changes the bread itself during the baking process. By adjusting your hydration rates you should also expect the changes in four main areas: appearance, crust, flavor and texture.
- Appearance – Less water will give a higher rise. The more water, the lower the loaf will be because of how slack the dough is. You can combat this by using a bread tin such as in this recipe for batter bread.
- Crust – Lean bread crust are often thick and hard. However, as you increase the water content, it results in a thinner crust that stays crispy and crunchier for a bit longer.
- Flavor – High hydration loaves will often have a more mild flavor, especially in sourdoughs. Push that water to a lower hydration rate for a nice tangy sourdough. This is because lower hydration doughs typically take longer to rise.
- Texture – The higher the hydration level of your bread, the softer, wetter and more open the crumb will be inside. The lower the level, the more dense and chewy the bread will become.
Why Does this even Matter?
Dough with a very low hydration rate will prevent the gluten from being able to stretch out and form nice chains. This leads to a weaker dough, poor gas retention, lower volume and can dry out quickly in the oven, especially when baked a lower temperatures. What does this mean? A dense, dry bread that goes stale fast and is not always pleasant to eat. So the hydration rate is very important in creating the best bread you’ll ever taste!
Since water is often the cheapest ingredient in bread making, you can create a nice soft bread with excellent crumb structure without a lot of money or effort. But you want to add in moderation. There is a fine line between a nice airy open crumb and a wet tasting dough that makes it hard for the dough to even develop a nice structure. Too much water leads to a weak structure that can collapse easily in rising, baking or cutting. It also causes bread to mold easily as opposed to going stale.
It’s easy to fall into the trap that more water is better and you see this a lot in sourdough bread making. Many people want to push that limit and end up with sad and disappointing loaves time and time again to the point they give up on the art of bread making entirely. Wouldn’t it be much better to make a modestly hydrated loaf that looks and taste fantastic so that you feel triumphant and ready to move on to the next step? Well let’s discuss some basics and how to improve your bread making skills!
Recipes Written Using the Weight or Metric System are Best
The tricky part of American recipes is the fact they are almost always written in volume measurements as opposed to using weight. Not all ingredients weigh the same. Brands of flour can vary, how you scoop the flour makes an impact, the type of measuring cup you make also comes into play. I made a video recently on showing this with flour and water. To make matters worse, many bread recipes will often give you a range of flour to add and let you figure it out. The hydration rates can end up varying widely as much as 20 percent or more! It is such a significant difference that your nice and airy cinnamon roll now becomes very dense and dry despite following the recipe’s guidance.
What if there was an easier way to always have consistent results in baking? The good news is there is! You’ll find you’ll never have to worry about brick cinnamon rolls, shapeless bread or wet tasting loaves. All you have to do is weigh your ingredients and learn the very basics of baking.
How to Calculate the Hydration Rate of an Ingredient within a Recipe
Each of the ingredients used within a recipe is determined by a percentage of the total amount of flour used. This calculation is referred to as the baker’s percentage. This is the foundation of all bread recipes and further supports why you should always weigh your ingredients as opposed to using cup or volume measurements and using a wide range of flour.
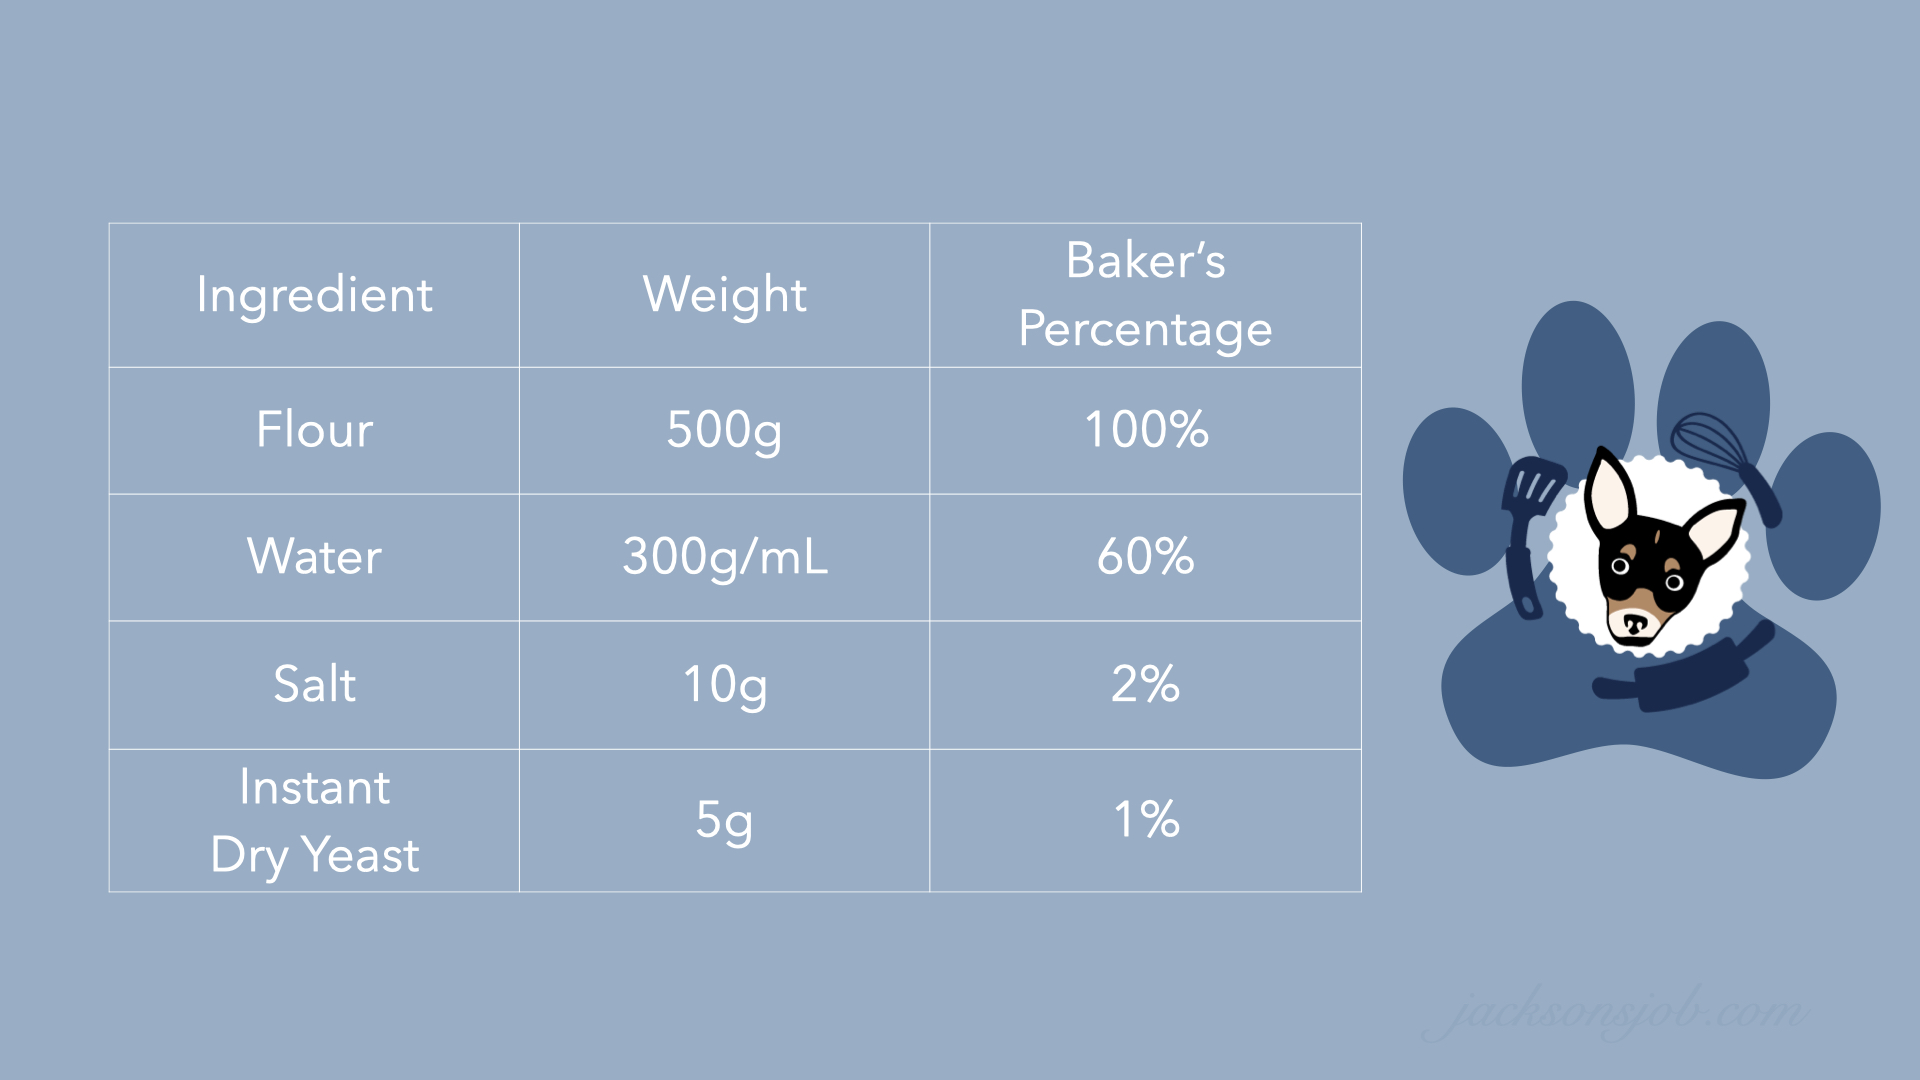
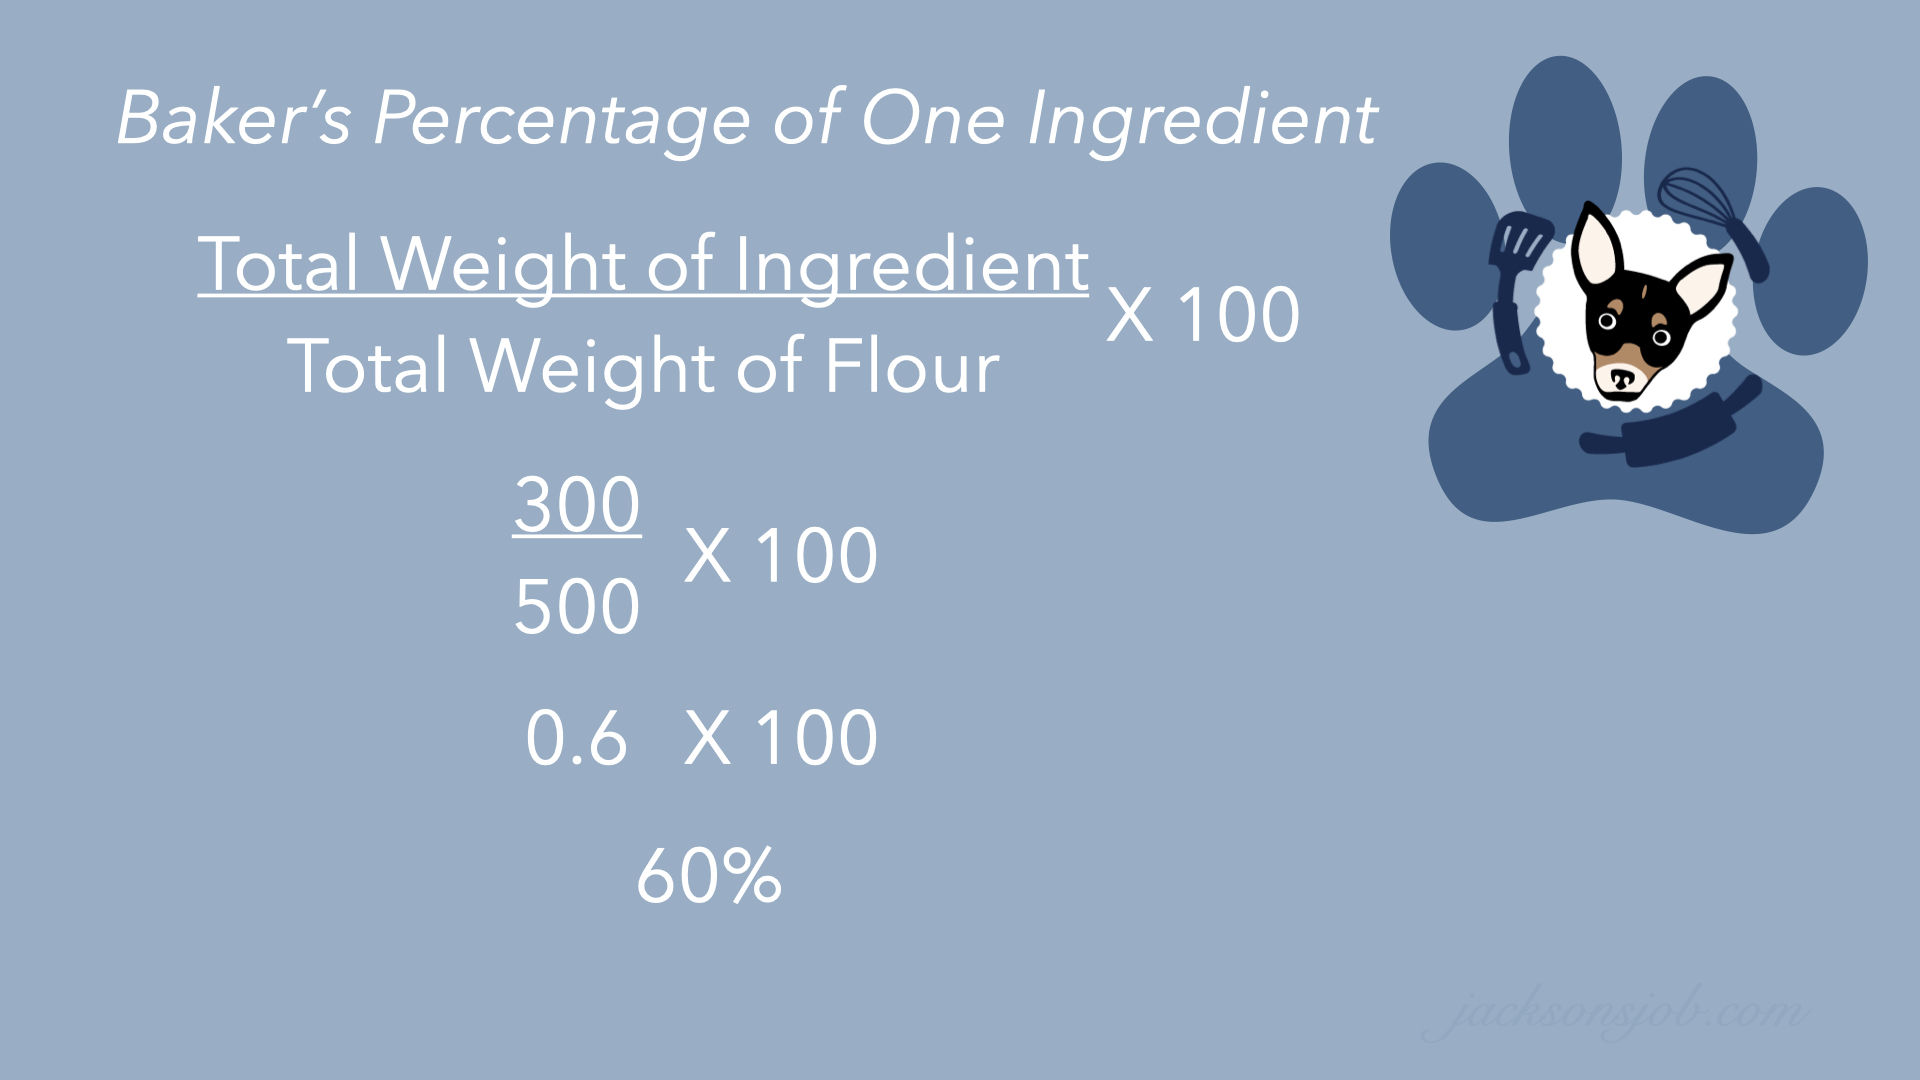
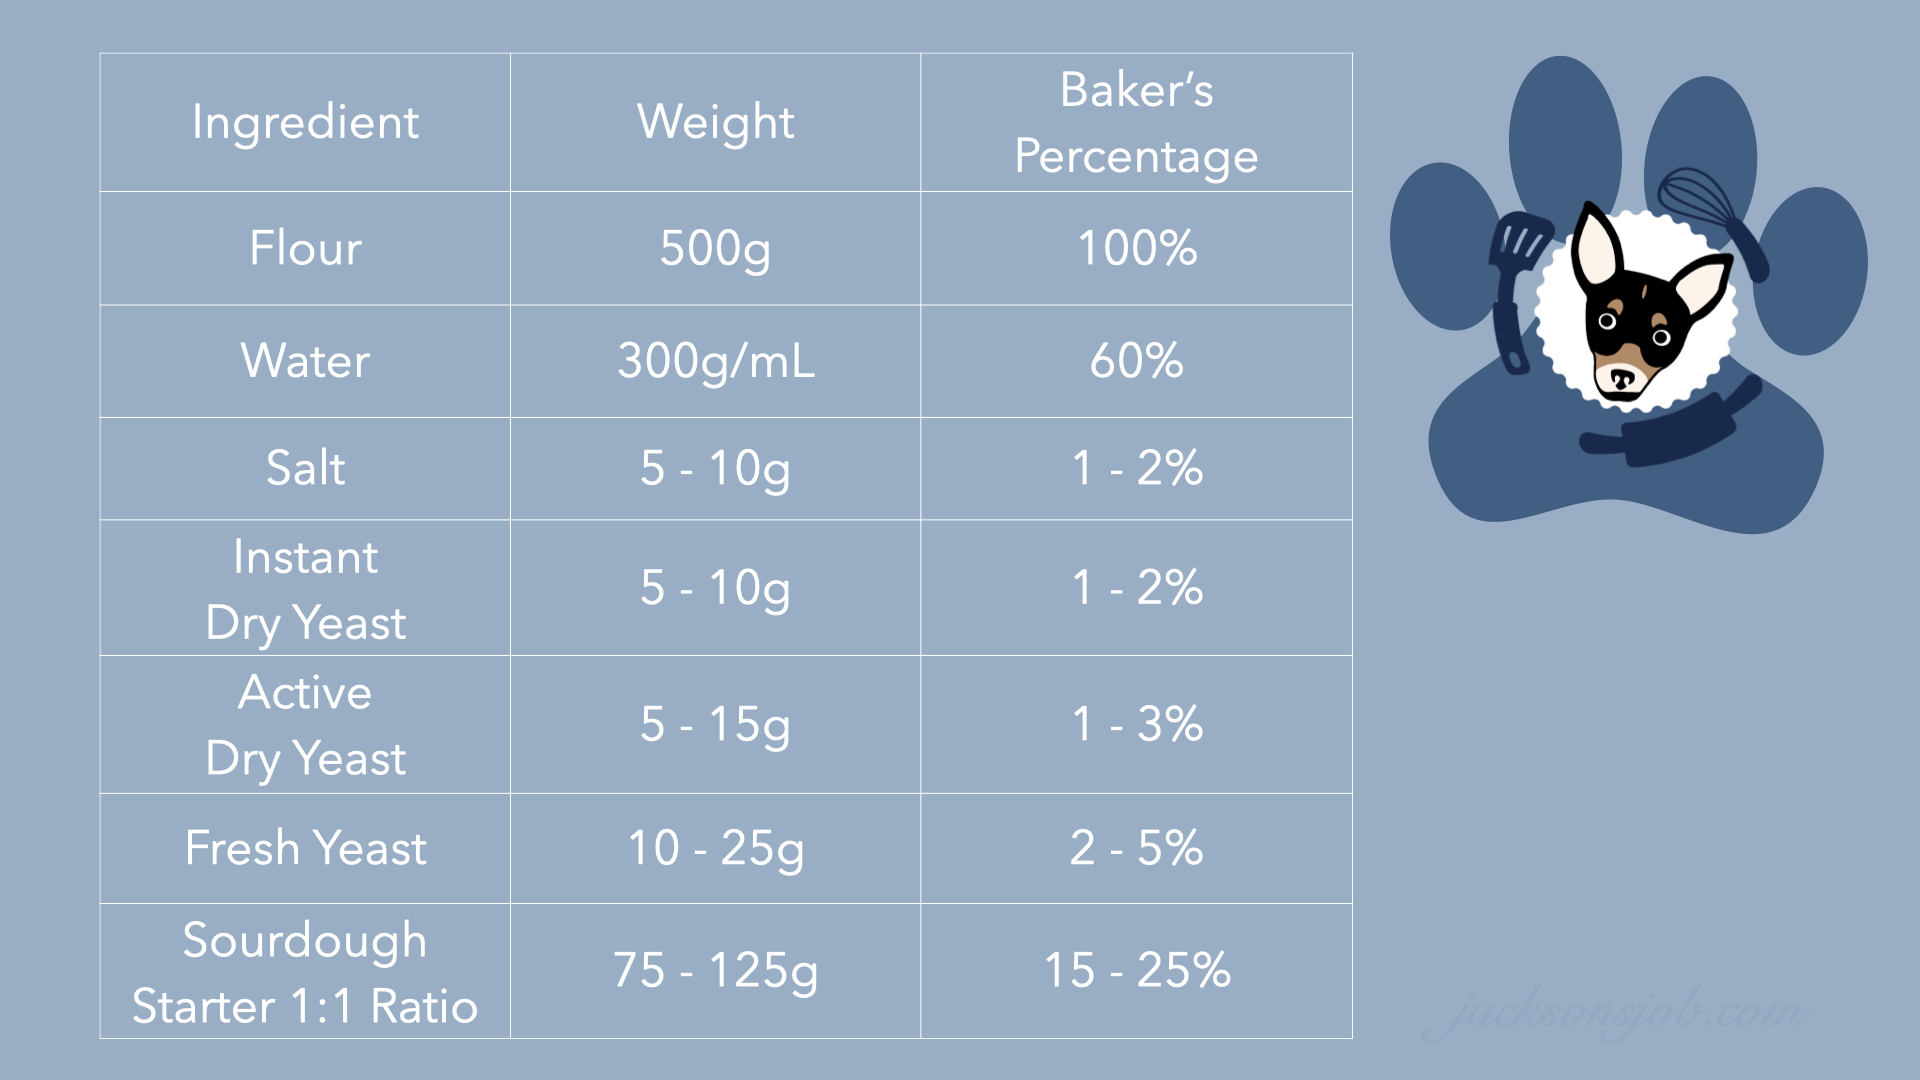
In all recipes, flour is pre-determined to be 100%. All other percentages are based off this principal. Let’s look at a basic bread recipe. As you can see below, there are 300 grams (or milliliters) of water in this particular recipe. So how do we take this information and find out the dough’s hydration rate of 60% as shown?
Let’s Do the Math!
We want to take the total weight of the water and divide it by the total weight of the flour first. Next, we want to multiply this number by 100% to get the total percentage of water. Sounds easy doesn’t it? Let’s look below on how to do this:
Wait…What? This adds up to more than 100 percent. So what gives?
If you take all these percentages and add them together, you get 163% in total. So does that mean the water isn’t 60% of the entire recipe? You are correct mathematically! The total percentage means nothing. What matters is that 100% percentage found in your star ingredient, flour. Calculating the water, yeast, salt and other ingredients based off the flour’s percentage simply makes it easy for bakers to make their own recipes based on their knowledge of the type of bread they are looking for in the end.
So you mean different breads have different hydration rates?
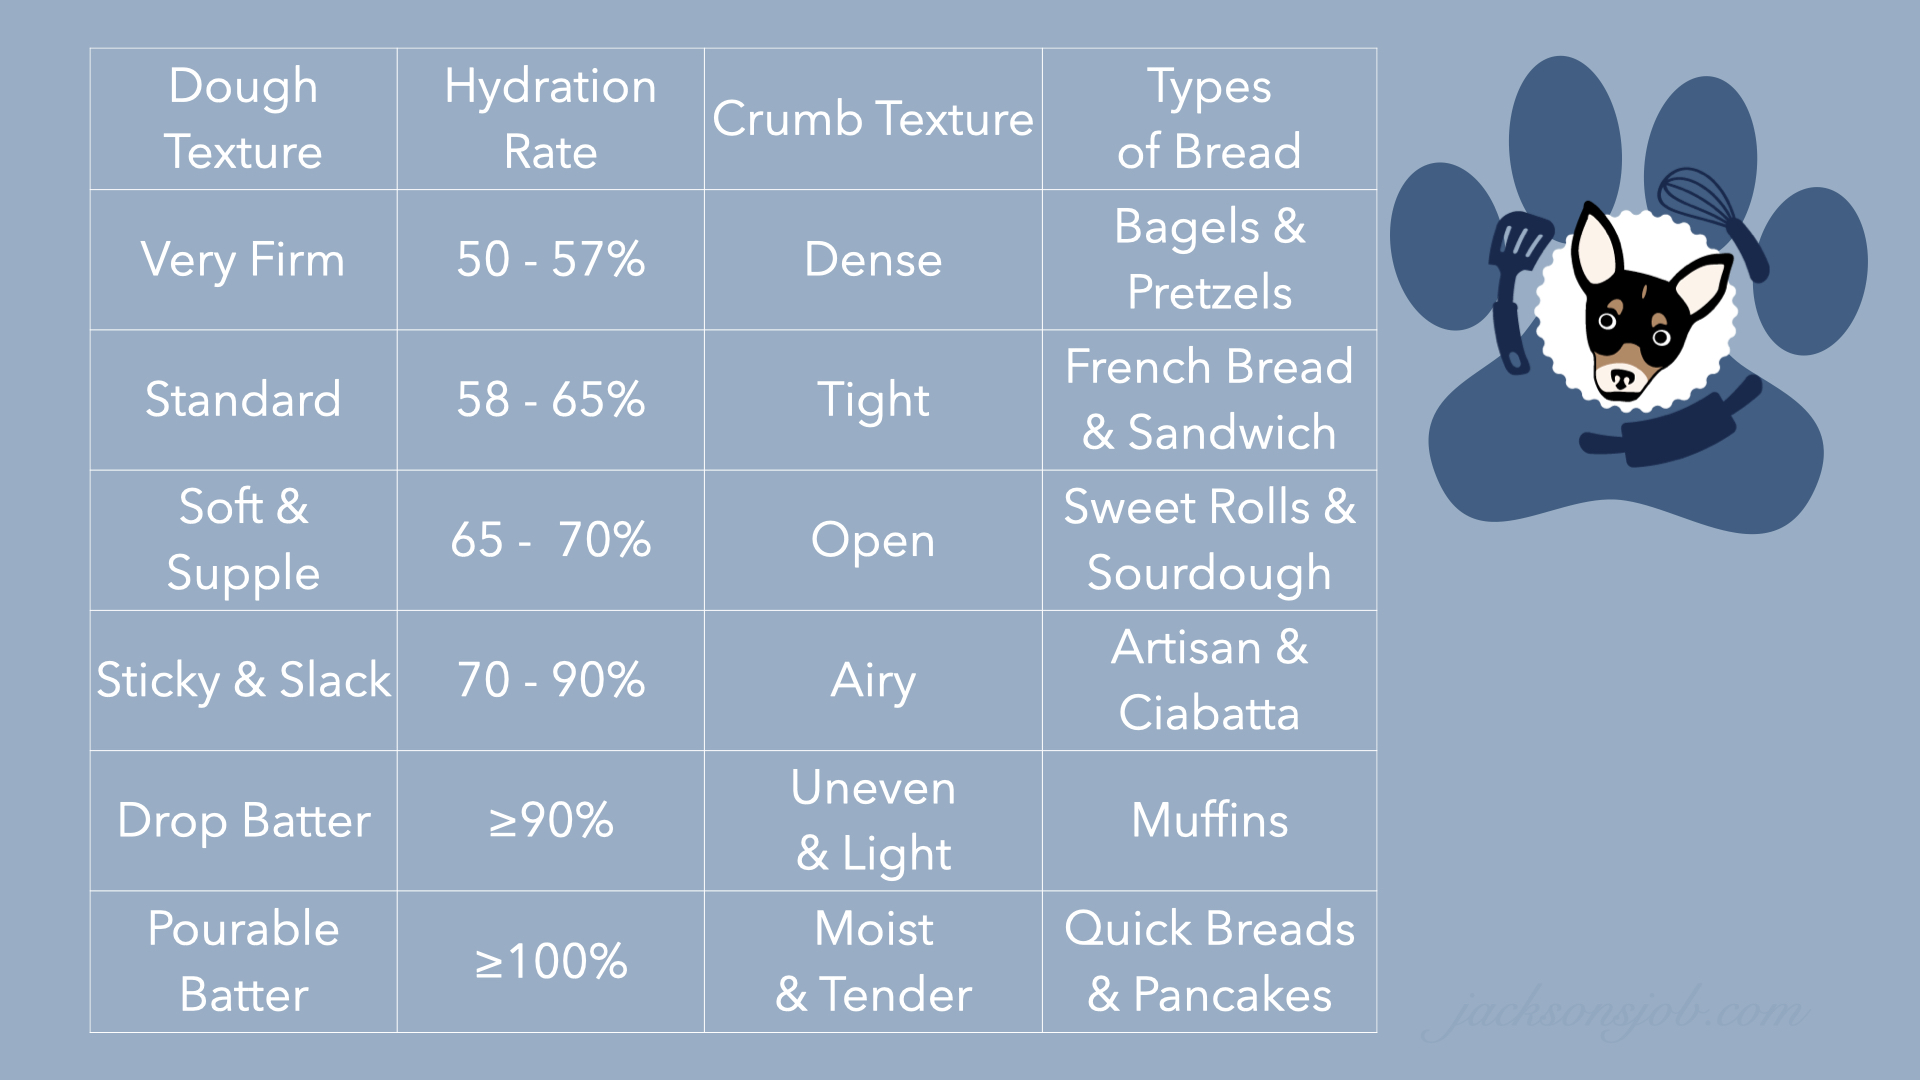
You betcha! For instance, look at the chart below to see some common types of breads and their percentage of hydration. Say I want to make a standard sandwich bread recipe. Looking at the chart, I would want a hydration rate of between 58 – 65 % water. The lower the percentage, the tighter your crumb will be which would be great for spreadable fillings like peanut butter and jelly. A more hydrated bread will give you a lighter and airier crumb. But how does one decide? Practice!
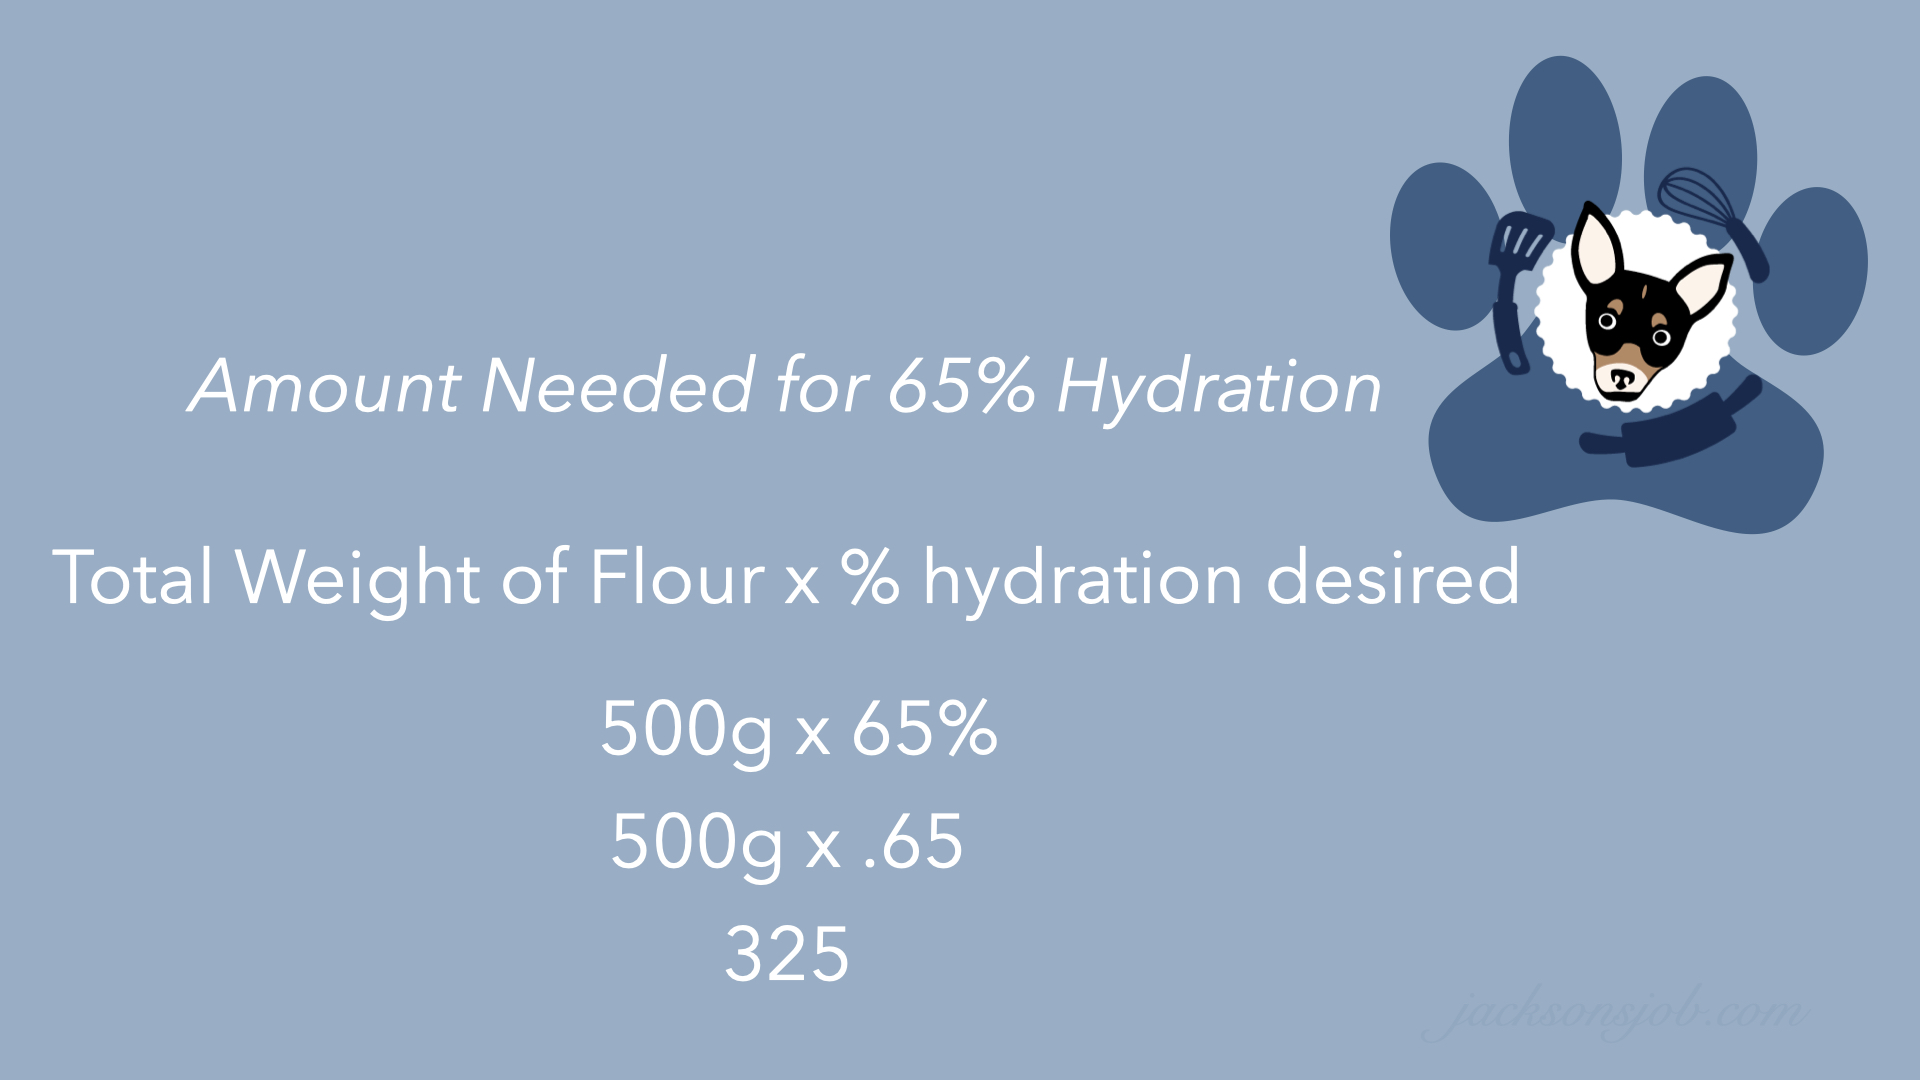
Let’s say we want to be adventurous and make the more moist sandwich bread. We decide to use the 65% hydration rate. A typical loaf tin starts out with 500 grams of flour. We take the amount of flour and multiply that by the hydration rate desired. This will give the amount of grams or milliliters of water needed in a recipe. You would simply do the same math for each of the ingredients and percentages desired in the bread recipe.
What about bread flour versus all-purpose versus whole-wheat or other flours?
Typically, when you are using a recipe that calls for all purpose flour, you will want to increase the hydration rate of the recipe about 2% for every addition 1% of protein. Both bread and whole wheat-flour have more protein than all-purpose or plain flour. This basically means it needs more moisture to have the same consistency as a plain flour loaf of bread. Let’s say your all-purpose flour is only 10%, but your bread flour, you want to increase your water by 4%. You would want to likewise decrease your water content if you are moving down in protein. Since most people start out baking with all purpose flour, the majority of my bread recipes are made with plain or all-purpose flour. So if you wanted to use my basic white bread recipe with a high protein flour, you would increase the water to get the same results.
Likewise, wheat flour absorbs more water. To get similar results when switching over to 100% whole wheat as opposed to white flour, you will want to increase your hydration between 10 – 15% to get similar results. This is because whole grains soak up more water like a higher quality sponge. That’s why it is so good for you and makes you feel full longer. Whole grains will continue to absorb more liquid in the gut and move things along nicely.
How do I figure out the hydration rates with sourdough starters involved?
Well, most starter recipes are made with a 1:1 ratio of equal parts water and flour by weight. This is done by design to make it easier to create or modify recipes. You simply divide the amount of starter you plan to use by half and add one half to the water weight and one half to the flour weight. For example, a recipe wants 100 grams of sourdough starter. Fifty grams of that is flour and the other fifty grams of that is water. If you don’t have a starter, you can use the chart below to calculate the percentage of other yeast needed and simply add 50 grams each of water and flour into the recipe. Or likewise, if you don’t have commercial yeast, you would use the table to calculate the starter required and subtract out the amount of flour and water you added. We will go into depth about this in the future. But for now, let’s look at at that basic lean bread recipe from earlier and extrapolate. A typical lean bread will have flour, water, salt, and a form of yeast. W will show the four most common yeasts used today. A baker will typically only use one type of yeast within a recipe, but it’s not unheard of to use a combination for some bakers. Remember that the flour is always at 100%. The water, salt and yeast can all vary based on they type of bread the baker wants, the flavor and how fast they want the dough to rise. You can use this chart and the ones above to try creating your own bread today!
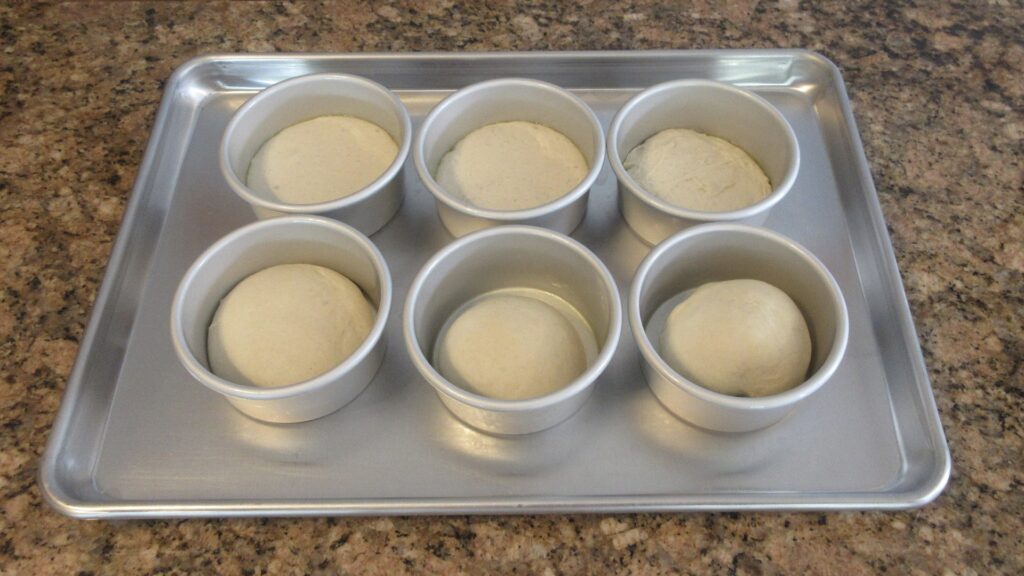
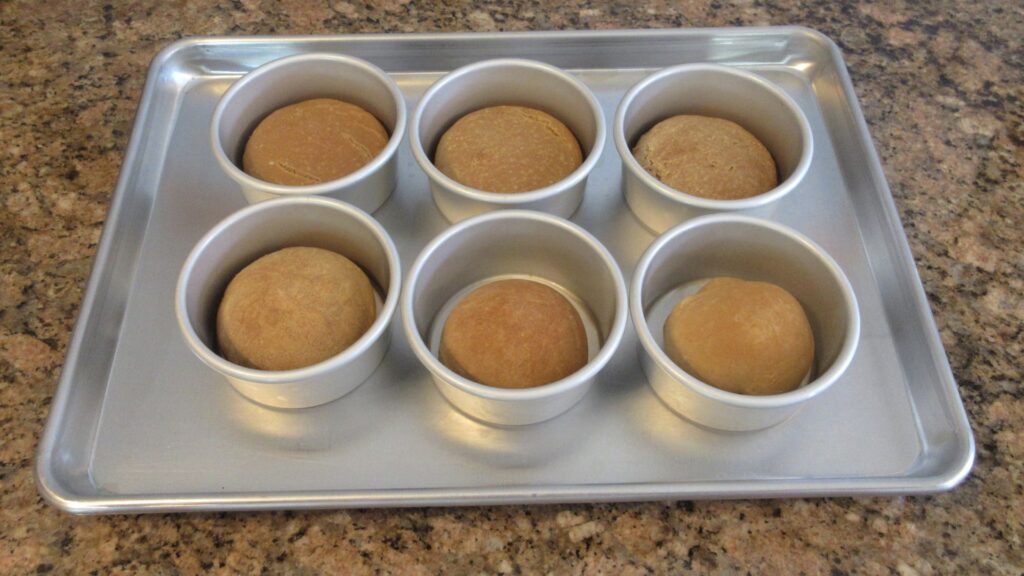
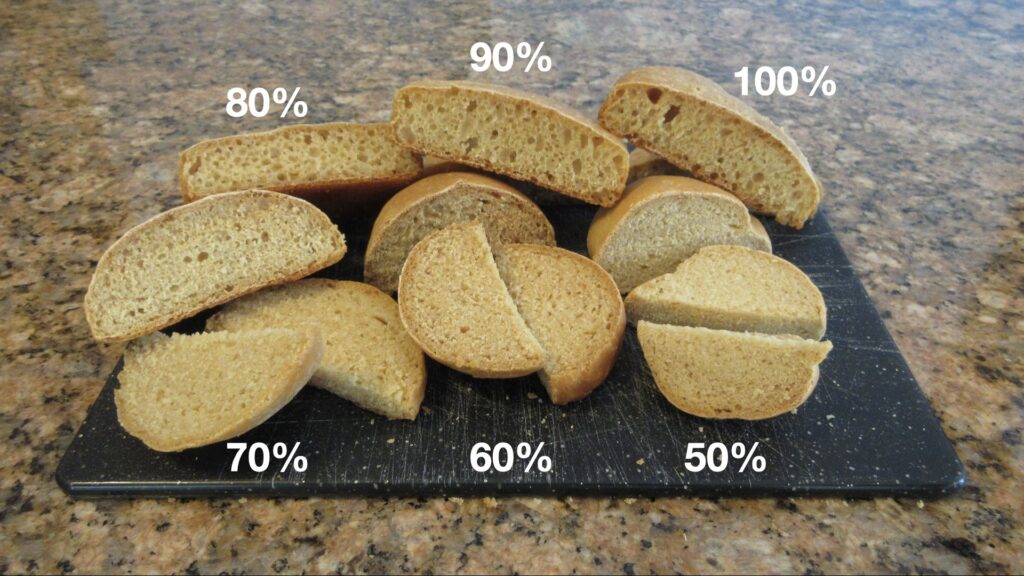
So what does a 50% hydration dough look like versus a 100% hydration dough?
Now that we have gone through all the math and looked at several charts, let’s look at actual pictures of bread baked with various hydration rates. We will look at 50 – 100 percent in 10% intervals. Notice the way the dough stays firm or goes slack after rising, the way it bakes in the pan. Which one holds its shape better? Look at the crumb structure when it’s cut open. Can you tell which one is which?
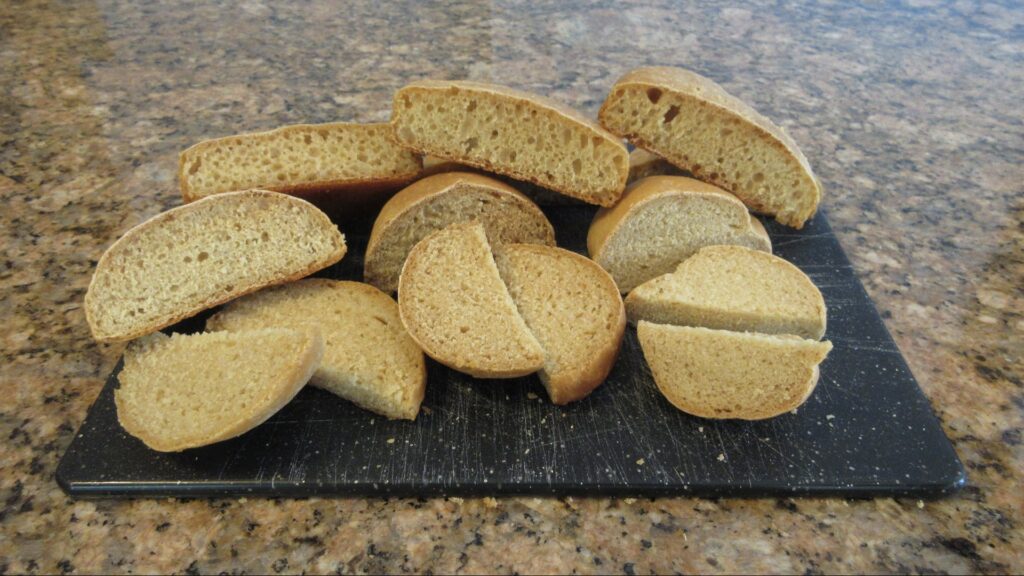
You did really good at the guessing! If you want to see the process, check out this video tutorial. Do you feel more confident in bread making now or more confused? Let me know in the comments below!
What hydration rate should I try as a beginner?
Which is the best hydration ratio for beginners? I recommend experimenting between 60 – 65% and going up and down from there. It is a nice workable dough and in the end, you’ll get a bread you’ll be proud to show off and share. Now that you’ve learned about hydration rates, Are you ready to make the switch to weighing your ingredients? Happy baking!
Well, that explains why my bread is inconsistent. LOL! Since, as you know, I tend to do things the old way and use volume measurements. I will however trying moving into this century, I’ve already bought the scales…
Haha, I think sometimes knowing why your bread is inconsistent helps you become a better baker even if you chose to stick with volume measurements. I often use a hybrid myself. I always weigh my dry ingredients, but there are many times I use the volume measurements for anything other than water. 😀