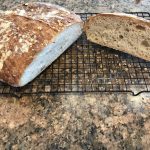
Artisan White Bread
A basic artisanal loaf to give you the feel for working with wet dough also called high-hydration. It's a fantastic way to learn how to make a nice airy bread with a chewy crust with minimal effort.
Servings: 12
Ingredients
- 3 ⅓ cups (500g) flour
- 1 ½ cups (360mL) water
- 1 tsp (5g) salt
- ¼ tsp (1g) yeast
Instructions
- In a large bowl, add flour, water, salt and yeast. Stir together with the back of a spoon until a shaggy dough forms. Cover and let side overnight at room temperature.
- The next day, wet your hands. Gently remove the dough from the bowl onto a clean work surface.Using damp hands, grab a top section of the dough. Stretch and bring it to the opposite side. Do this for each side. This will create tension.
- Line a colander or a bowl with a lint-free clean towel. Dust the towel liberally with flour. With damp hands, pick up the dough and place it seem side up in the container. Dust the top and fold the towel over. Leave for approximately 1-3 hours or until double in size.
- Place one rack in the middle of the oven and the second rack as close to the bottom as possible. On the bottom rack, place a pan filled with 1/2" (1cm) of water. Do not use a glass container for the water as it could break or shatter due to thermal shock. Preheat oven 450F (230C.)
- Gently remove the top towel and invert the dough onto a baking sheet in one swift movement. If the towel sticks, wet your fingers and gently pull the towel away while pressing on the dough.
- Slice the top with a sharp knife quickly about 1/8" (3mm) deep and the length of the bread.
- Open the stove carefully, as the steam could burn you.
- Bake 40 - 45 minutes. Center of bread should reach 212F (100C.)
- Let bread cool completely on wire rack before serving.
Notes
An important note on dry yeast: Instant dry and active dry yeasts are not the same. If using active dry yeast, you must activate the yeast according to the manufacturer's instructions in order for the dough to rise properly. You typically need to activate or "bloom" the yeast by adding it to warmed liquid for several minutes.
Instant dry yeast can be added to the dry ingredients and typically does not need to be activated prior to use. However, some brands of dry yeasts still require adding warm liquids, so be sure to read the label. Rapid, quick and fast acting dry yeasts will rise much faster than instant and active dry yeasts. For best results, always read and follow the instructions provided on the packet as the rising time varies widely between manufacturers.
Nutrition
Serving: 1 slice | Calories: 111 kcal | Carbohydrates: 24.4 g | Protein: 4.4 g | Sodium: 193.8 mg