Sourdough Starter
A simple recipe to make a sourdough starter at home.
Servings: 1
Ingredients
- 1 tbs (15g) flour, packed tight
- 1 tbs (15mL) water
Instructions
- Day One: In a clean container, mix the flour and water. Cover with cling film or a lightweight cloth. Poke holes for ventilation.
- Day Two: Check for any blue, black or green molds. If any appear, discard and use different flour. If no mold, leave it alone.
- Day Three: Check again for molds. If there are non, it is time to feed the starter. Add another 1 tbs of flour and 1 tbs of water. Stir and cover.
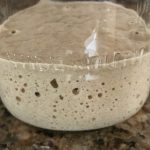
- Day Four: If you start to see signs of life (such as marks on the side of the container showing it climbed up the sides, bubbles, strange smells,) then begin feeding twice a day with the same amount listed above. This will strengthen your starter.
- Day Five: Discard all but about 1 Tbs (15mL) of the mixture. Feed another 1 tablespoon of flour and 1 tablespoon of water.
- Days Six - Nine: Feed twice a day, about 12 hours apart. Be prepared for some funky smells. Don't worry, keep feeding. This is the good bacteria fighting off the bad. It is to be expected.
- Day 10: If the mixture has a pleasant smell, you can begin using the starter, congratulations! At this point, you can also store it in the fridge, feeding weekly. If you plan to use it daily, keep it on the counter and feed at least once every two days. You will need to feed it the same volume it is currently. For example, if it weighs 150g (about 1 cup,) you'll need to give it 75g (1/2 cup) each of water and flour.If it still smells unpleasant, discard all but about 1 tbs (15mL) and continue feeding twice a day. Not everyone will have a useable starter in this time frame, don't be discouraged. Mine took several months to mature.
Nutrition
Calories: 50 kcal | Carbohydrates: 11 g | Protein: 1.5 g